Ruki
By: 3Forty Media | Follow me on Themeforest | Follow me on Twitter
Table of Contents
- Introduction
- Installation
- Plugins
- Demo Import
- Customizer
- - Home & Category Featured Posts
- Navigation
- Widgets
- Post Formats
- Theme Demos Setup
- Optimization (Page Speed/SEO)
- AMP
- Translate Theme
- Theme Customizations
- Theme Classes and Hooks
- Sources and Credits
- Changelog
Introduction - top
Thankyou for purchasing Ruki, I really hope you enjoy using Ruki as much as I enjoy developing it.
This document will help you get your theme installed and setup and get the most out of your theme but if you do have questions please leave a comment or send me an email via my profile page.
If you love Ruki, please take a moment to rate it or leave a comment or review, it really helps. Thanks so much!
Installation - top
Step 1Once you have downloaded the zipped package to your computer, you will need to extract it to a location you choose. Then simply open that extracted folder and you will see Ruki.zip, this is your theme, and we just need to install it.
Option 1. Wordpress Admin (Easy Method)
Login to your WordPress Admin and go to: Appearance > Themes.
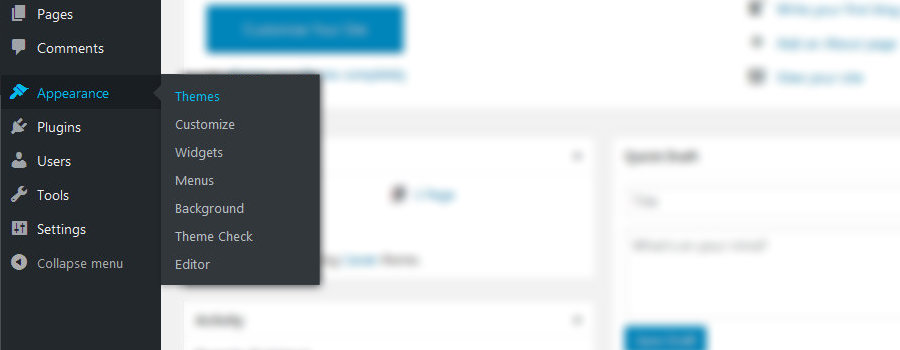
At the top of the screen click Install Theme. Next at the top of the screen click Add New and then click the Upload Theme button at the top of the screen. Click the browse button and locate Ruki.zip select it and press the Install Now button
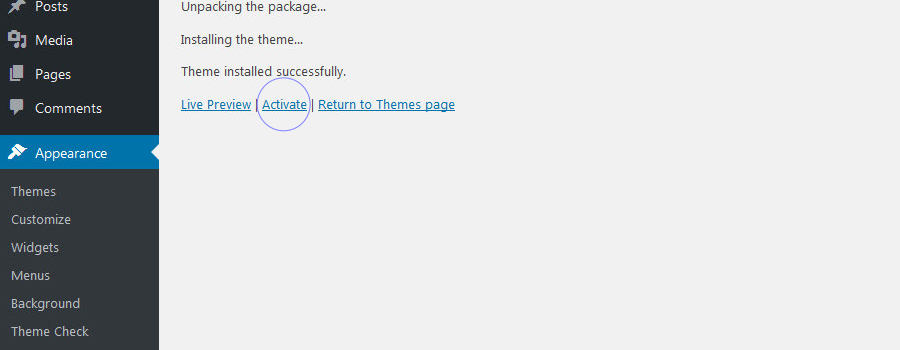
Once installation is complete click Activate to activate the theme.
Option 2. FTP (Advanced Method)
Extract Ruki.zip and upload the extracted Ruki folder to your wordpress installation themes folder /wp-content/themes/
Finally you need to activate the theme. Go to: Apperance > Themes and click Activate on the Ruki theme
Step 2 (optional)
Demo Data
If this is a fresh or first time installation you may find it helpful to import the data from the demo. I have supplied an XML file in your download that contains posts, comments and pages with the option to download associated media. To import this file go to: Tools > Import and Click Run Importer
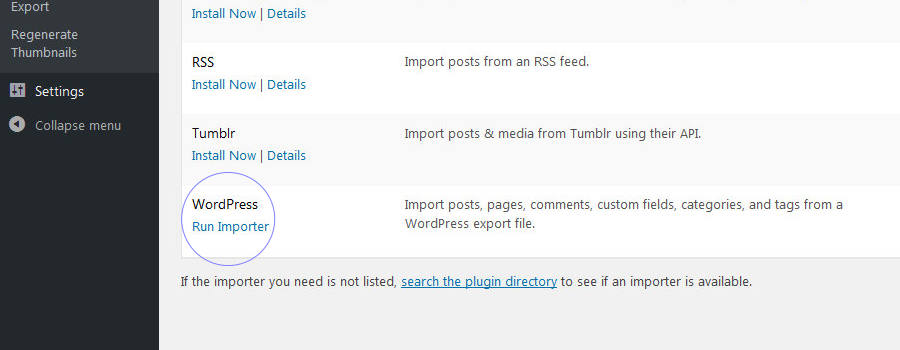
Click the Browse button and locate the demo-data.xml file inside your download folder. Next click Upload file and import. Once the import is complete you will be asked if you would like to import media, this will download all the associated media for the posts and pages. It may take a a couple of minutes to download all the media so be patient.
All post images are from Freepik.com and are licensed for free or commercial use with attribution.
Step 3
Install Plugins
To get the most out of Ruki I have created a few custom plugins that you will need to download. There are also optional plugins that you might want to install. Once you have installed your theme you will be prompted to download and install the Ruki required plugins and some recommended plugins.

Click begin installing plugins. This will take you to the Install required plugins page. To begin installing plugins, check each plugin you want to install and select Install from the drop down menu. This will install your plugins.
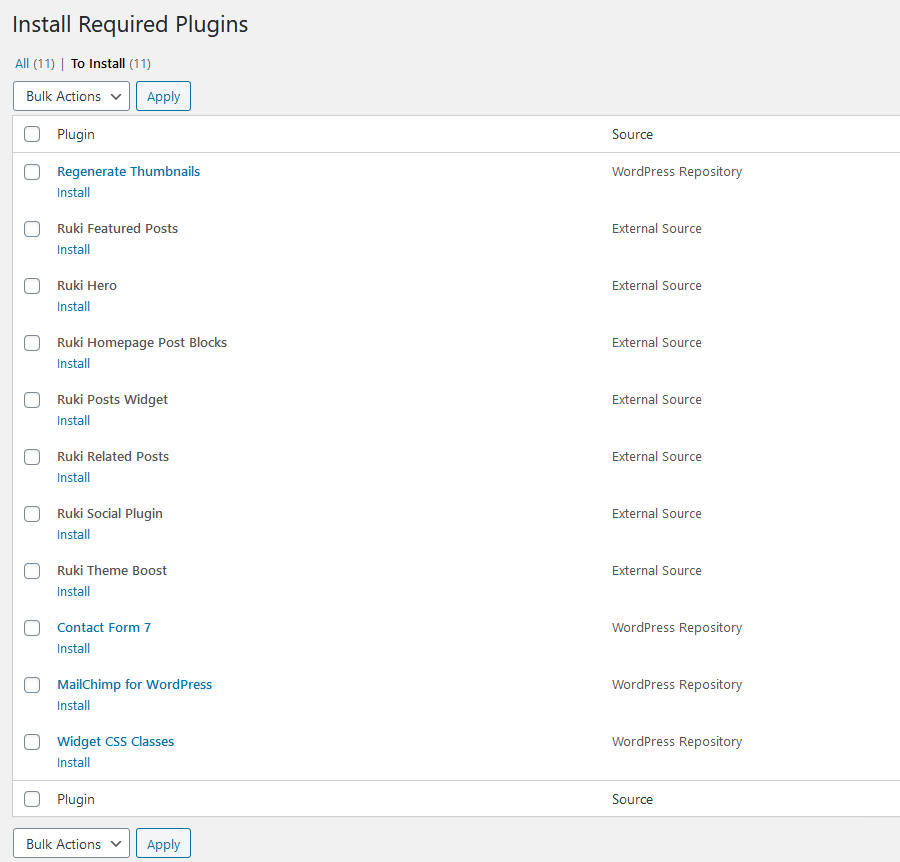
Once installed go to Plugins > Installed Plugins and click activate on each plugin you just installed.
Step 4
Regenerate thumbnails
Not required if you only have demo data
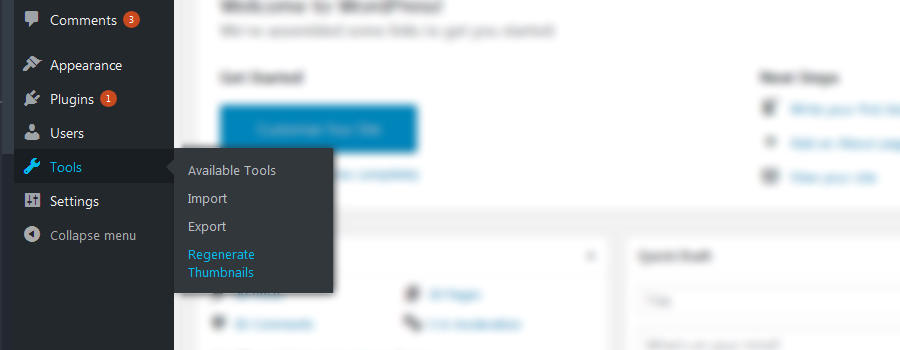
Now your theme is installed and you have downloaded and activated at least the essential plugins. At this point I recommend regenerating your thumbnails which will create the sizes we need for your theme without changing or deleting any other sizes you already have. Click Tools > Regenerate Thumbnails
In order to generate the sizes required by Ruki, you should ensure that your original images are large enough to generate the required sizes. Your original image should be at least 1600px wide and 1250px tall. If your original images are smaller than this, WordPress will generate whatever sizes it can with the size available.
All you have to do is click Regenerate Thumbnails for All x Attachments, then wait as your new thumbails are generated. Once complete you can view your homepage and see all your existing post thumbnails resized for your theme. Now you can head on over to the customizer and start updating settings.
Demo Import
Ruki includes many pre-built demos and optional demo content to help get you started. To install a demo
- Install & Activate One Click Demo Import
- Go to Appearance > Import Demo Data.
- Select a demo and click Import Demo
- Confirm by clicking Continue & Import
Note* If you have existing content you should click Switch to Manual Import to import just the settings. The required Widgets WIE file and Customizer DAT file are included in your full theme download
Plugins - top
Ruki Hero
This plugin displays hero content (posts) of our choosing on the homepage with optional slider
Ruki Featured Posts
Display featured posts on your homepage and category pages
Ruki Posts Widget
A highly customizable posts display widget.
Ruki Related Posts
Configurable related posts plugin
Ruki Social Plugin
A social media widget and content share plugin
Regenerate Thumbnails
This plugin enables you to batch resize all your thumbnails and feature images to the size used by Ruki. I highly recommend this plugin if you want to get the best out of Ruki.
All other plugins are supported by Ruki but it is your choice whether you install them or not
Customizer - top
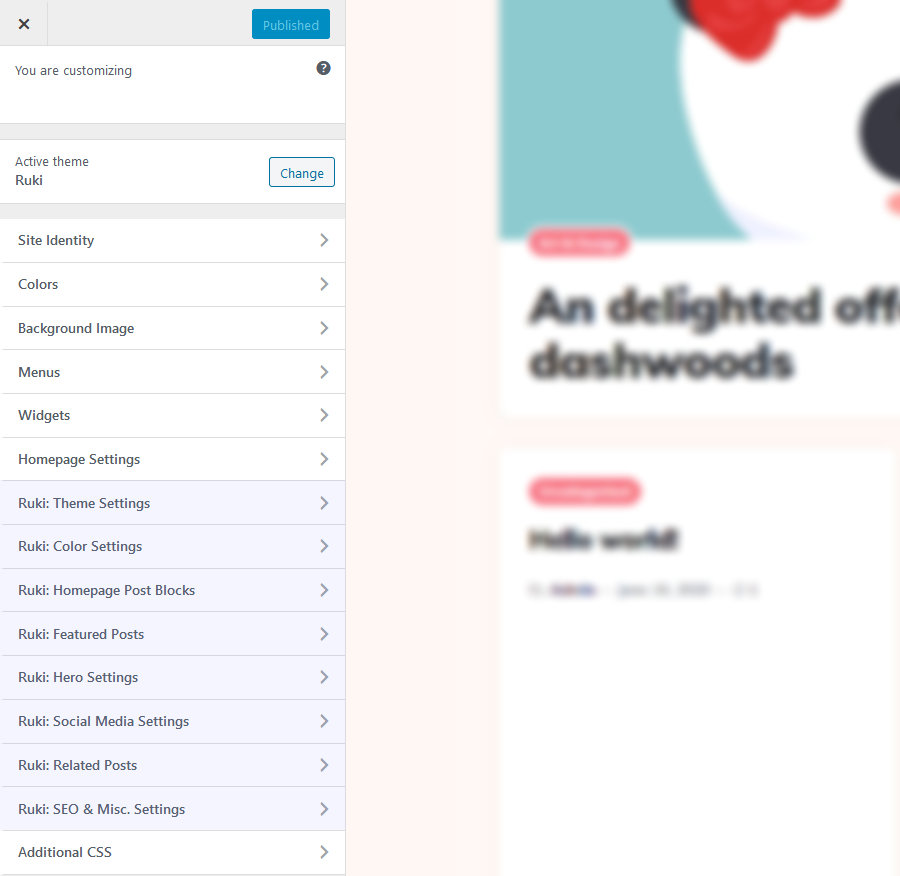
Ruki comes with several theme specific customization options. These are located in the WordPress Customizer which can be located in Apperance > Customize. All Ruki options are labelled Ruki: Setting Name. These options allow you to configure your theme and turn on/off included features
All Ruki Plugin options can also be found here
We will go into more detail on some of these below, but before we do that lets look at the Site Identity setting and in particular choosing the correct logo for your blog.
Uploading your logo
Ruki is designed from the outset to support high resolution displays as standard. Whatever logo you upload Ruki will scale it down by 50%, this will then look great on high resolution displays. To ensure that your logo looks good across both standard and high resolution displays and at the size you want it to be, you need to upload a logo that is twice the size you want it displayed.
You can customize the size of your logo for desktop, tablet and mobile in:
Appearance > Customize > Ruki: Theme Settings > Header SettingsThis will override the theme settings described above
Home & Category Featured Posts - top
Watch the Video
Ruki allows you to choose posts to feature in a custom loop on the homepage and in each category.
Configure the category featured display
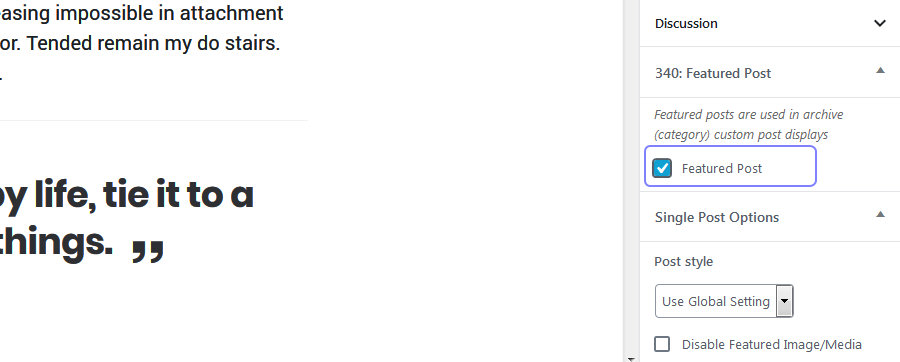
In the new post/edit post page scroll down to Ruki: Featured Post. Check to display this post in the featured area for the category it is related to
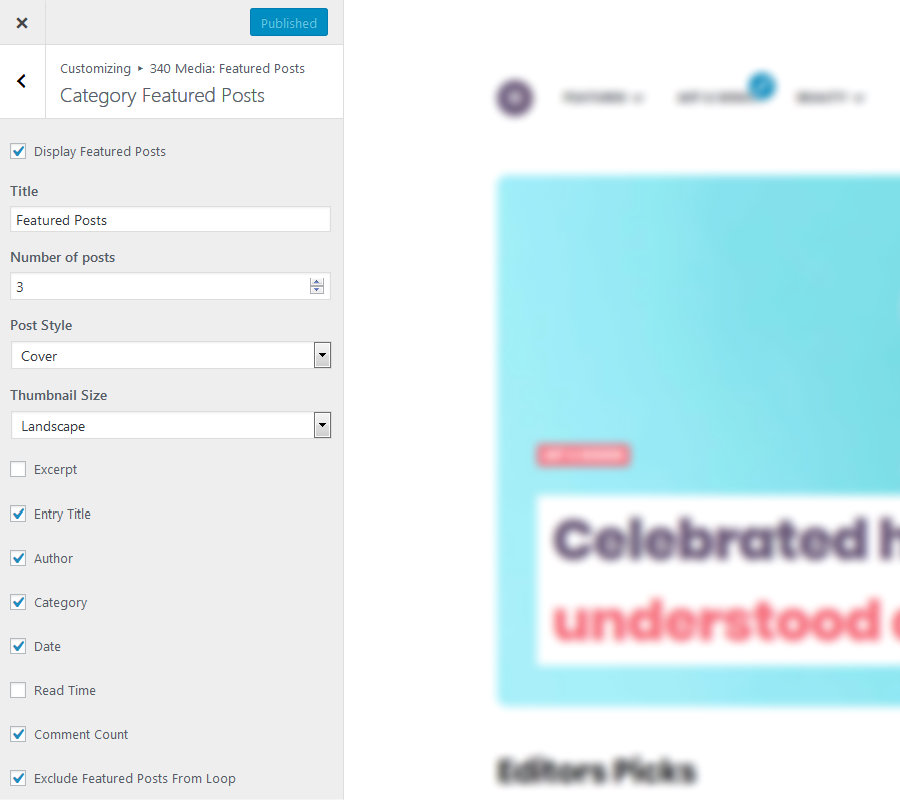
To confgure the settings for category featured posts
Appearance > Customize > Ruki: Featured Posts > Category Featured Posts
Configure the home featured display
To confgure the settings for home featured posts
Appearance > Customize > Ruki: Featured Posts > Home Featured Posts
Navigation - top
Ruki has support for four menus: Appearance > Menus. At the very least you will need to create one Primary menu, other menus are optional
To create a new menu
- Click create a new menu and enter a name for your menu (I.e. primary Menu) and click "Create Menu"
- Select the categories, posts & pages that you want to add to the menu and and click "Add to Menu"
- Select a display location for this new menu (I.e. Primary Menu) and click 'Save Menu"
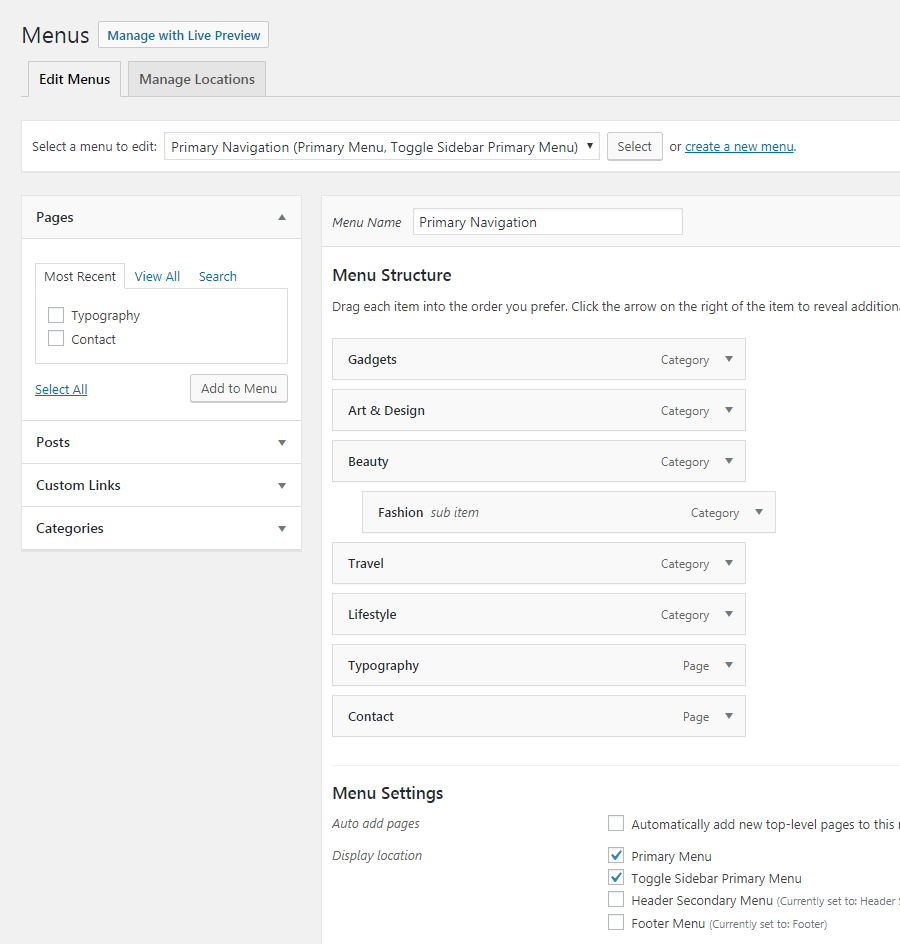
Primary Menu
The primary menu is located in the site header for the following header layouts:
- Default
- Logo Below Nav
- Logo Left Menu
Additionally within the slide out sidebar if you choose to which acts as your primary toggle menu on small devices.
The primary menu supports 3 levels of hierarchy Parent > Child > Grandchild and the slide out sidebar supports unlimited levels.
Toggle Sidebar Primary Menu
Located in the slide out sidebar and supports unlimited levels
Footer Menu
The footer menu is located on the right hand side of the footer
Split Menu
Ruki has an additional primary menu called a "split menu". The split menu is separated into Split Menu Left Items and Split Menu Right Items. Depending on the size of your logo and the length of menu links each menu supports up to 4 items each.
Split Menu is located only in the eader layout: Logo Split menu
To activate the split menu:
Apperance > Customize > Ruki: Theme Settings > Header Settings Change the header layout to "Split Menu"
Once activated you will need to create your left and right menus if they do not already exist.
If you require more menu items and/or a large logo, you should change the header layout in the customizer to default.
Widgets - top
Ruki has 9 widgetized sidebars and a sidebar for each category supporting all standard WordPress widgets and all supported Plugin Widgets
To activate a widget go to: Appearance > Widgets and drag your widgets to the appropriate widget area. You can also manage your widgets inside the Customizer if you prefer.
Ruki includes two custom widgets
- Ruki Posts Widget - Highly customizable posts display widget
- Social widget - Display icons and links to your social media channels
"In Loop" Sidebars
Each category and the homepage has it's own "In Loop" sidebar which you will find in the standard Widget Admin Page. Add your widgets as normal and then activate the sidebar display in the customizer
Appearance > Customize > Ruki: Theme Settings > Homepage Settings
Appearance > Customize > Ruki: Theme Settings > Archive/Category Settings
Scroll to the bottom and select a widget position. This is the position within the loop that you want your sidebar to appear.
Supported Plugins & Widgets
Ruki includes styling for the following third party Plugins and Widgets.
- WooCommerce
- SB Instagram
- WP Instagram
- Contact Form 7
- Mail Chimp
Post Formats - top
Ruki supports 4 post formats
- Standard
- Gallery
- Video
- Audio
- Image
Depending on which format you select for your posts the content, images and embeded media is uniquely displayed. Lets look at them.
Standard
Select this format for standard posts, you can emebed media, galleries, images and video as normal.
Gallery
The gallery format is ideal for gallery posts where you have images you want to showcase. This format adds a gallery icon to posts (if enabled). I recommend placing your primary gallery to the top of the post and disabling featured media, but you can apply your own configuration to gallery posts.
Video/Audio
Select this format when you want to feature your embeded video in the featured header area of posts. If selected this format will take the first video/audio in your post and display it in the featured header area. Your first video/audio embed will then be removed from the post leaving your formatted text and any other media you have embeded.
You should upload a featured image to video posts as this will be displayed in archive loops.
Image
The image format produces an alternative display style in archive type views. The entry header and meta data will overlay the post thumbnail. Image format works just like a standard post for single post view.
Theme Demos Setup - top
All theme demo's are different configurations of theme settings in the customizer, there are many possible combinations, more than are seen in the demos. Simply change the settings for each customizer panel to create the look you want. Experiment and have fun!
General Settings
Appearance > Customize > Ruki: Theme Settings > Header Settings Logo Below Nav
Appearance > Customize > Ruki: Theme Settings > Homepage Settings > Post Style Default
Appearance > Customize > Ruki: Theme Settings > Homepage Settings > Thumbnail Aspect Ratio Uncropped
Footer widgets
Appearance > Widgets > Footer Column (1/2/3) Ruki: Posts Widget (configure as you like)
Appearance > Widgets > Footer Bottom Mailchimp: Sign-Up Form
Appearance > Widgets > Footer Bottom Ruki: Social Widget (configure as you like)
Add or replace these with any widgets you like
Home Loop widget
Appearance > Widgets > Home Loop Ruki: Posts Widget (configure as you like)
Add or replace these with any widgets you like
Once you have added your "In Loop" widgets go to:
Appearance > Customize > Ruki: Theme Settings > Homepage SettingsScroll to the bottom and set the widget in loop position. This is the position within the the loop it will appear (E.g. The sixth item in the loop)
General Settings
Appearance > Customize > Ruki: Theme Settings > Header Settings Logo Below Nav
Appearance > Customize > Ruki: Theme Settings > Homepage Settings Check: Display Sidebar
Appearance > Customize > Ruki: Theme Settings > Homepage Settings > Post Style Default
Appearance > Customize > Ruki: Theme Settings > Homepage Settings > Thumbnail Aspect Ratio Uncropped
Hero Settings
Appearance > Customize > Ruki: Hero Settings Check: Full Width
Appearance > Customize > Ruki: Hero Settings > Style Hero
Appearance > Customize > Ruki: Hero Settings > Number of posts 4
Appearance > Customize > Ruki: Hero Settings > Number of slides to show 2
Configure the posts you want to display as you like and toggle meta displays
You will then want to add your widgets
Appearance > Widgets > Static Sidebar Ruki: Posts Widget (configure as you like)
Add or replace these with any widgets you like
Footer widgets
Appearance > Widgets > Footer Column (1/2/3) Ruki: Posts Widget (configure as you like)
Appearance > Widgets > Footer Bottom Mailchimp: Sign-Up Form
Appearance > Widgets > Footer Bottom Ruki: Social Widget (configure as you like)
Add or replace these with any widgets you like
Home Loop widget
Appearance > Widgets > Home Loop Ruki: Posts Widget (configure as you like)
Add or replace these with any widgets you like
Once you have added your "In Loop" widgets go to:
Appearance > Customize > Ruki: Theme Settings > Homepage SettingsScroll to the bottom and set the widget in loop position. This is the position within the the loop it will appear (E.g. The sixth item in the loop)
General Settings
Appearance > Customize > Ruki: Theme Settings > Header Settings Logo Below Nav
Appearance > Customize > Ruki: Theme Settings > Homepage Settings Check: Display Sidebar
Appearance > Customize > Ruki: Theme Settings > Homepage Settings > Post Style Default
Appearance > Customize > Ruki: Theme Settings > Homepage Settings > Number of Columns 1
Appearance > Customize > Ruki: Theme Settings > Homepage Settings > Thumbnail Aspect Ratio Uncropped
Hero Settings
Appearance > Customize > Ruki: Hero Settings Check: Display Hero
Appearance > Customize > Ruki: Hero Settings > Style Hero
Appearance > Customize > Ruki: Hero Settings > Number of posts 1
Appearance > Customize > Ruki: Hero Settings > Number of slides to show 1
Configure the posts you want to display as you like and toggle meta displays
Featured Posts Settings
Appearance > Customize > Ruki: Featured Posts > Home Featured Posts Check: Display Featured Posts
Appearance > Customize > Ruki: Featured Posts > Home Featured Posts Check: Full Width
Appearance > Customize > Ruki: Featured Posts > Home Featured Posts > Number of Posts 6
Appearance > Customize > Ruki: Featured Posts > Home Featured Posts > Number of Columns 4
Appearance > Customize > Ruki: Featured Posts > Home Featured Posts > Layout Carousel
Sidebar widgets
Appearance > Widgets > Static Sidebar Ruki: Posts Widget (configure as you like)
Add or replace these with any widgets you like
Footer widgets
Appearance > Widgets > Footer Column (1/2/3) Ruki: Posts Widget (configure as you like)
Appearance > Widgets > Footer Bottom Mailchimp: Sign-Up Form
Appearance > Widgets > Footer Bottom Ruki: Social Widget (configure as you like)
Add or replace these with any widgets you like
General Settings
Appearance > Customize > Ruki: Theme Settings > Header Settings Logo Below Nav
Appearance > Customize > Ruki: Theme Settings > Homepage Settings Uncheck: Display Sidebar
Appearance > Customize > Ruki: Theme Settings > Homepage Settings > Post Layout Grid
Appearance > Customize > Ruki: Theme Settings > Homepage Settings > Post Style Default
Appearance > Customize > Ruki: Theme Settings > Homepage Settings > Thumbnail Aspect Ratio Landscape
Featured Posts Settings
Appearance > Customize > Ruki: Featured Posts > Home Featured Posts Check: Display Featured Posts
Appearance > Customize > Ruki: Featured Posts > Home Featured Posts > Number of Posts 3
Appearance > Customize > Ruki: Featured Posts > Home Featured Posts > Number of Columns 3
Appearance > Customize > Ruki: Featured Posts > Home Featured Posts > Layout Grid
Appearance > Customize > Ruki: Featured Posts > Home Featured Posts > Thumbnail Size Landscape
Footer widgets
Appearance > Widgets > Footer Column (1/2/3) Ruki: Posts Widget (configure as you like)
Appearance > Widgets > Footer Bottom Mailchimp: Sign-Up Form
Appearance > Widgets > Footer Bottom Ruki: Social Widget (configure as you like)
Add or replace these with any widgets you like
Home Loop widget
Appearance > Widgets > Home Loop Ruki: Posts Widget (configure as you like)
Add or replace these with any widgets you like
Once you have added your "In Loop" widgets go to:
Appearance > Customize > Ruki: Theme Settings > Homepage SettingsScroll to the bottom and set the widget in loop position. This is the position within the the loop it will appear (E.g. The sixth item in the loop)
General Settings
Appearance > Customize > Ruki: Theme Settings > Header Settings Logo Below Nav
Appearance > Customize > Ruki: Theme Settings > Homepage Settings Uncheck: Display Sidebar
Appearance > Customize > Ruki: Theme Settings > Homepage Settings > Post Loop Display Type Custom Post Blocks
Post Blocks Settings
Appearance > Customize > Ruki: Homepage Post Blocks > Posts Block Check: Enable Blocks
Configure each block as you like.
Footer widgets
Appearance > Widgets > Footer Column (1/2/3) Ruki: Posts Widget (configure as you like)
Appearance > Widgets > Footer Bottom Mailchimp: Sign-Up Form
Appearance > Widgets > Footer Bottom Ruki: Social Widget (configure as you like)
Add or replace these with any widgets you like
General Settings
Appearance > Customize > Ruki: Theme Settings > Header Settings Logo Below Nav
Appearance > Customize > Ruki: Theme Settings > Homepage Settings Uncheck: Display Sidebar
Appearance > Customize > Ruki: Theme Settings > Homepage Settings > Post Loop Display Type Custom Post Blocks
Post Blocks Settings
Appearance > Customize > Ruki: Homepage Post Blocks > Posts Block Check: Enable Blocks
Configure each block as you like.
Hero Settings
Appearance > Customize > Ruki: Hero Settings Check: Display Hero
Appearance > Customize > Ruki: Hero Settings > Style Cover
Appearance > Customize > Ruki: Hero Settings > Number of posts 1
Appearance > Customize > Ruki: Hero Settings > Number of slides to show 1
Configure the posts you want to display as you like and toggle meta displays
Footer widgets
Appearance > Widgets > Footer Column (1/2/3) Ruki: Posts Widget (configure as you like)
Appearance > Widgets > Footer Bottom Mailchimp: Sign-Up Form
Appearance > Widgets > Footer Bottom Ruki: Social Widget (configure as you like)
Add or replace these with any widgets you like
General Settings
Appearance > Customize > Ruki: Theme Settings > Header Settings Logo Below Nav
Appearance > Customize > Ruki: Theme Settings > Homepage Settings > Post Style Cover
Appearance > Customize > Ruki: Theme Settings > Homepage Settings > Thumbnail Aspect Ratio Uncropped
Footer widgets
Appearance > Widgets > Footer Column (1/2/3) Ruki: Posts Widget (configure as you like)
Appearance > Widgets > Footer Bottom Mailchimp: Sign-Up Form
Appearance > Widgets > Footer Bottom Ruki: Social Widget (configure as you like)
Add or replace these with any widgets you like
Home Loop widget
Appearance > Widgets > Home Loop Ruki: Posts Widget (configure as you like)
Add or replace these with any widgets you like
Once you have added your "In Loop" widgets go to:
Appearance > Customize > Ruki: Theme Settings > Homepage SettingsScroll to the bottom and set the widget in loop position. This is the position within the the loop it will appear (E.g. The sixth item in the loop)
Add this class to the home loop widget (you need to install the Widget CSS Classes plugin)
ruki-special-widget
This widget will inherit the Special Widget color settings configured in Widget Color Settings below
Color Settings
Appearance > Customize > Ruki: Color Settings > Header Colors Select the colors you like
Appearance > Customize > Ruki: Color Settings > Widgets Select the colors you like
Choose your "Selected Widget" colour settings and footer widget colour settings if you want to match the demo
Appearance > Customize > Ruki: Color Settings > Footer Colors Select the colors you like
You can combine and configure your own layouts within the customizer and preview the changes before you publish them, have fun.
Optimization (Page Speed/SEO)
Out of the box Ruki is fast and on a good server will load in under 1 second. If you want to achveive the best score on Google Page Speed tests, GtMetrix and Pingdom this simple guide will show you how.
Google PageSpeed, GTMetrix & Pingdom scores can differ depending on your server speed, number of widgets & plugins.
Step 1Install Autoptimize Plugin
Plugins > Add New > Search: "Autoptimize"
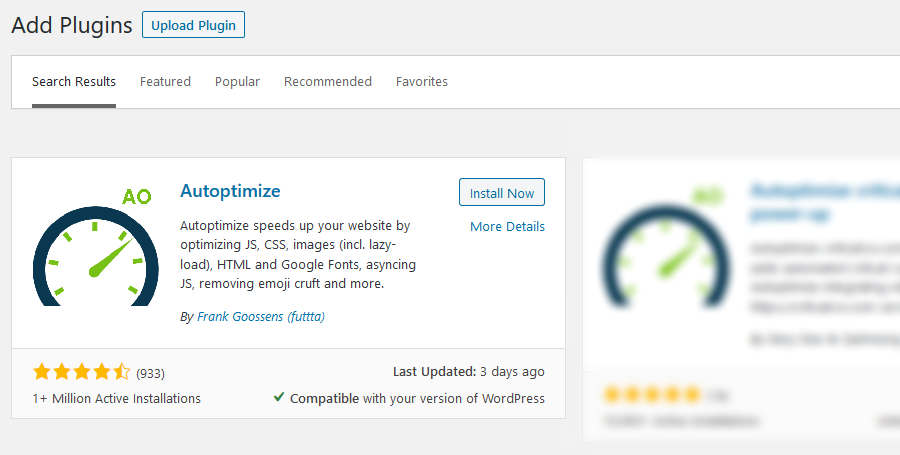
Once installed activate the plugin
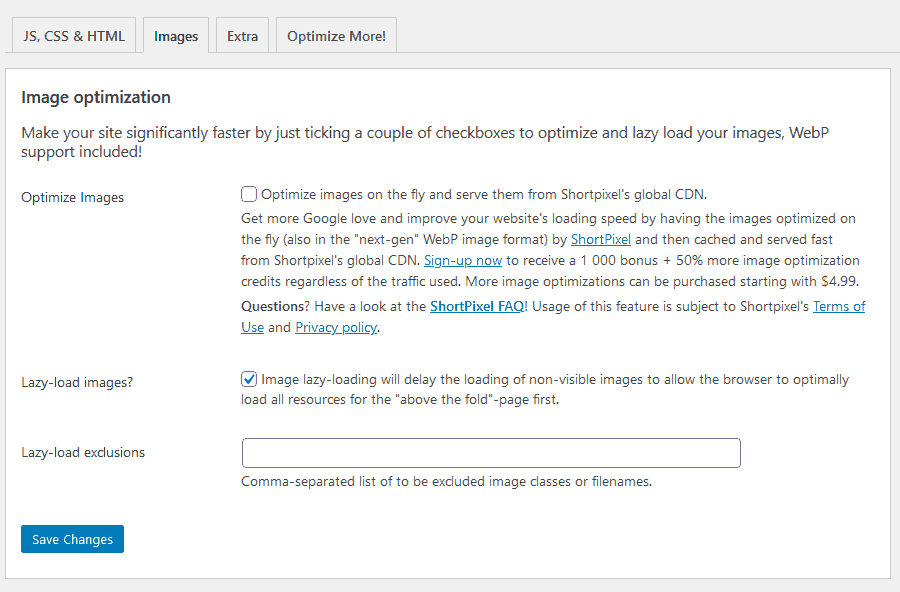
Configure Autoptimize settings
Settings > Autoptimize Or click the "Autoptimize" icon at the top of the page
Check the same settings you see in the below screen shots for best results and click "Save"
JS, CSS & HTML

Images
Extra
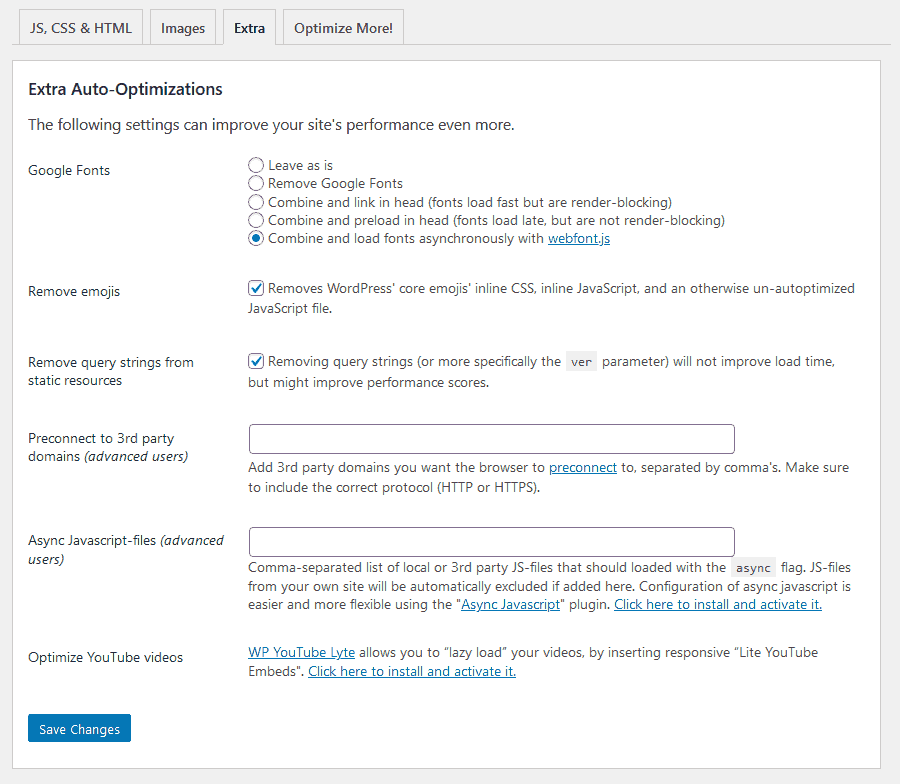 Step 2.
Optimize Images
If you have not already, install "Regenerate Thumbnails" Plugin
1. Appearance > Customize > Ruki: Optimization Settings
2. Change "Image Quality" to 50 > Publish
3. Tools > Regenerate Thumbnails > Regenerate Thumbnails for All x Attachments
Step 3.Upload an avatar
Appearance > Site Identity > Site Icon
It is important that you upload an optimized image (low file size)
That's it, now head on over to the Google PageSpeed Insights and run the tests.Install and Configure AMP
Install AMP
- Go To Plugins → Add New. and search for AMP
- Download & Activate the Official AMP plugin
- There will now be a new AMP section in the main menu.
Configure AMP
- Go to AMP → Settings
- Check Reader in the Template Mode section
- Expand the Reader Theme tab & select AMP Legacy*
- Expand the Supported Templates tab and check Posts, Pages. Uncheck everything else.
- Click Save
* Ruki has a custom AMP theme which will be used instead of the Legacy Theme.
Theme Translation
Ruki is translation ready. This guide shows you how to translate your theme using the Loco Translate Plugin.
From within your Dashboard navigate to Plugins > Add New and Search for Loco Translate. Download and activate the plugin. You will then see a new "Loco Translate" section in the admin panel.
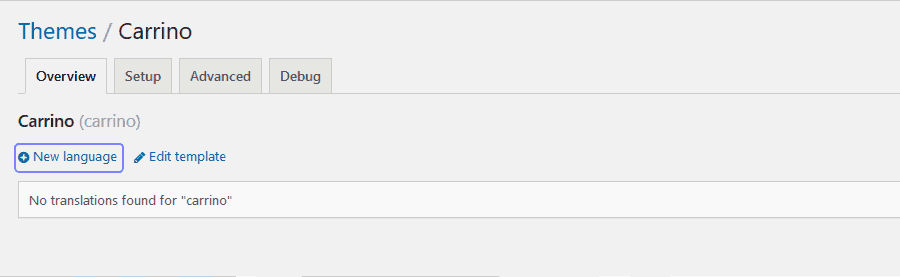
1. Loco Translate > Themes
All available themes will be listed. Click the theme you want to translate.
2. Click "New Language" (or click the language file if you are editing an existing translation)
3. Choose a language from the drop down menu and click "Start Translating"
4. Select the text you want to translate
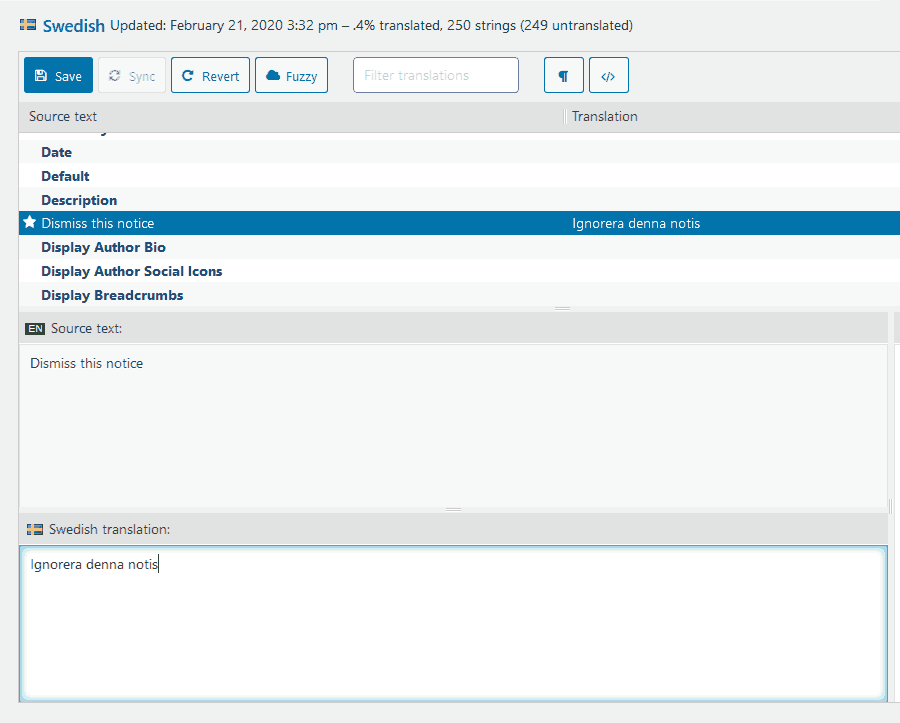
5. Type your translation in the bottom pane and click "Save"
Theme customizations
I have included a child theme on your download package called Ruki-child.zip. If you would like to customize your theme you may prefer to install the child theme via the same method described in the Installation section and make any changes you require directly to the child theme. The child theme will inherit all the functions and styling of the parent theme and leave you free to make any changes you need without affecting your main theme.
Theme Classes & Hooks
Ruki features lots of custom hooks. You can use these hooks to further extend theme functionality or add your own functions or widget areas.
Hooks
- ruki_before_header - Before Header
- ruki_after_header - After Header
- ruki_after_content - After Content - Single
- ruki_before_post_pagination - Single
- ruki_before_footer - Before Footer
- ruki_after_footer - After Footer
- ruki_before_loop - Before Archive Loop
- ruki_after_loop - After Archive Loop
- ruki_before_comments - Before Comments
- ruki_after_comments - After Comments
To use a hook you will need to use the add_action function; for example to use the Ruki_after_header hook
function my_custom_function( ) {
	$var = 'var';
	echo esc_attr($var);
}
add_action('Ruki_after_header', 'my_custom_function', 10 );
Custom Classes
Widgets
ruki-special-widget
You will need to install the "Widget CSS Class" plugin. You can then add a class to widgets that you want to give a different background colour (Special Widget)
Once added you can change the colour settings in Appearance > Customize > Ruki: Colour Settings > Widgets
Header Subscribe Button
ruki-subscribe
You will need to check "CSS Class" in the Screen Option tab at the top of the Menus page. You can then add a class to menu items in the CSS Classes field
Gutenberg
Ruki uses several custom class in the Gutenberg editor:
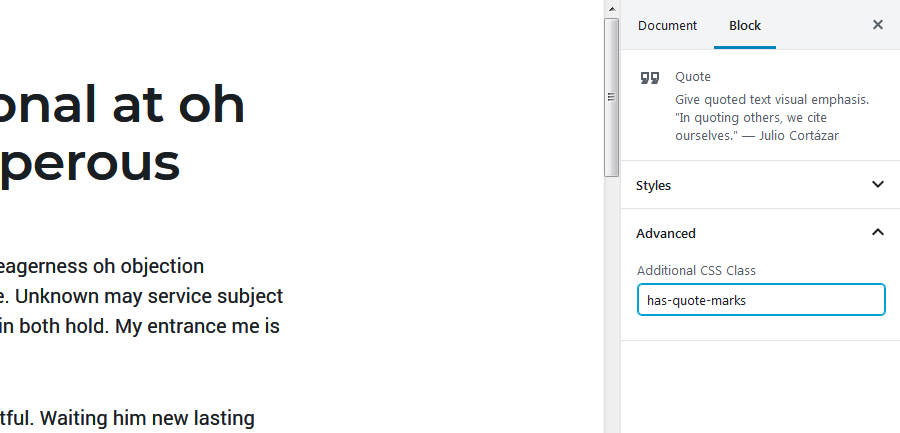
has-quote-marks
This class adds quote marks to blockquotes and pullquotes. To add a class in the gutenberg editor. Click Advanced in the Settings Panel > Block Tab and add this class
ruki-list
This class adds an alternative style to unordered lists
ruki-ordered-list
This class adds an alternative style to orered lists
Sources and Credits - top
I've used the following images, icons or other files as listed.
- PHP, HTML and CSS code by 3Forty Media
- Fontello Icon Fonts
- Post Images Freepik.com
Changelog - top
April 25, 2023 - Version 1.3.7
- Webp mobile logo support
- Fixed updated date showing twice/unable to disable
- Github Icon changed
March 08, 2023 - Version 1.3.6
- Added height HTML attribute to logo
February 20, 2023 - Version 1.3.5
- Editor styling fixes
February 12, 2023 - Version 1.3.4
- Added ability to exclude categories from homepage blog list.
- Fixed: different excerpt sizes for non-standard post formats
- Fixed: iframe border when using HTML video embed
January 21, 2023 - Version 1.3.3
- Fixed PHP error when importing demos on installations with no content.
August 09, 2022 - Version 1.3.2
- Added support for featured videos with video shortcode
May 27, 2022 - Version 1.3.1
- Fixed demo imports
May 26, 2022 - Version 1.3
- WordPress 6.0 Compatibility Updates
May 18, 2022 - Version 1.2.9
- Added AMP theme
May 17, 2022 - Version 1.2.8
- Added Discord support to social media plugin
May 12, 2022 - Version 1.2.7
- Added ability to install theme demos
February 05, 2022 - Version 1.2.6
- Fixed static homepage not displaying content
February 03, 2022 - Version 1.2.5
- Fixed WordPress 5.9 compatibility issues.
- Added front-page.php template
October 30, 2021 - Version 1.2.4
- Removed post stretching (filling available space) in Masonry layout
October 27, 2021 - Version 1.2.3
- Added support for author email in social links
September 01, 2021 - Version 1.2.2
- Fixed quote marks in multi paragraph quotes
July 16, 2021 - Version 1.2.1
- Fixed category display bug when one post in a category
June 09, 2021 - Version 1.2.0
- Fixed Header Color settings rendering bug
- Added more sticky header color options
- New translation file
May 22, 2021 - Version 1.1.9
- Improved WordPress 5.7.2 compatibility
May 09, 2021 - Version 1.1.8
- Added ability to toggle sidebar for individual posts and pages (Theme Boost Plugin)
May 03, 2021 - Version 1.1.7
- Updated plugin URL's
February 22, 2021 - Version 1.1.6
- Compatibility with WordPress 5.6.x
- Fixed empty hentry footer element when no tags/share icons in single post
- Updated gutenberg editor styles for WordPress 5.6.x
January 09, 2021 - Version 1.1.5
- Added Tag filter support for all plugins
- Added updated/modified date display for single posts
October 19, 2020 - Version 1.1.4
- Fixed shop header image outputting raw HTML
- Fixed PHP error when blog has no categories or posts
- Minor CSS updates
September 22, 2020 - Version 1.1.3
- Fixed archive title escaping HTML span tag
September 19, 2020 - Version 1.1.2
- Improved logo function SEO output
- Minor CSS updates and bug fixes
- New RTL CSS file
September 06, 2020 - Version 1.1.1
- Improved responsive video embeds for posts created in the old editor (4.x)
- Minor CSS updates
August 28, 2020 - Version 1.1.0
- Added ability to display videos in blog/archive loops
- Updated Ruki Featured Posts Plugin (now displays videos and ability to choose post format)
- Updated Ruki Homepage Post Blocks Posts Plugin (now displays videos and ability to choose post format)
- Fixed language string bug in searchform
August 20, 2020 - Version 1.0.4
- Updated editor Gutenberg styling for WP5.5
- Added fix for blurry logo in Chrome browser
- Hero thumbnails are now clickable
- Added Alt. Layout option in customizer (previously needed to be configured for each post)
- Fixed figcaption overlay in Gutenberg gallery
- Added color settings for Ruki subscribe button
- Added option to add pill styling to any primary nav menu item
- Fixed Telegram share link in Ruki Share Plugin
- Minor styling fixes and updates
August 10, 2020 - Version 1.0.3
- Fixed gallery display bug
July 24, 2020 - Version 1.0.2
- Minor CSS updates
- Fixed comment count not showing in single post
- Fixed video and audio format featured content
- Minor plugin updates
July 23, 2020 - Version 1.0.1
- Updated RTL CSS
July 15, 2020 - Version 1.0
- Initial Release